Monday, April 29, 2019

Easy Card to make


Hello there!

Today I am sharing a card made by my students. Its simple and easy to make.


This is the insert. I punched the border and glued a floral patterned tape underneath the punched border.


Material Used:

  • Cream coloured textured Card Stock - A4 size
  • Blue printed self adhesive tape
  • 3D stickers
  • Cream coloured scrap
  • Sizzix Framelits Circle scallops
  • Sentiment stamp
  • Black and yellow Inks
  • Cream coloured paper for insert
  • Butterfly border small punch
  • Floral Printed Tape
  • Glue and Dimensional Dots


Hope you like this card. Watch out for more on my blog.


Pin It

Sunday, April 28, 2019

A Touch Of Glitter


Hi Friends!

Hope you are all enjoying Holidays. Here for the past two-three days, the temperatures have risen unbearably. Humidity is also so high that it is really irritating. I am not able to do much accept for the daily chores and a little bit of creativity. 

Today I am sharing with you three Thank you cards.  The Design is almost the same with little differences.

Usually I don't like glitter. But sometimes they add that extra to the look during a festive season or for some special occasions. 

The base of all these cards is A4 size white card stock folded into half. I have used hand made papers of different colours. They are embossed with different patterns and glittery.

I have used gold glittery self adhesive tape and satin/tissue roses.


Here I have used pink flower pattern embossed glittery hand made paper.

I have used the medium sized border punch for the sentiment label. Stamped the sentiment with black ink and dabbed a bit of pink on the edges. Alas I didn't have matching pink shade. No matter how many shades you have, the required shade is not always available.


This is the insert of the card.


Here I used leaf patterned hand made paper.


This is the insert. All the inserts are white coloured papers but exact colour is not reflected here. Sorry I am not a good photographer and the light is also a problem.


Here I have used orange coloured hand made paper.


Here I just dabbed the edges of the insert with blue ink.


Materials Used:

  • White card stock
  • Hand made paper strips
  • Glitter tape
  • Roses with leaves made of tissue/satin
  • sentiment stamps
  • Black, Blue, Pink inks
  • Border punch
  • Glue and Dimensional dots
Hope you like these cards.


Pin It

Thursday, April 25, 2019

Thank You Card in Purple

Hello Friends!

Hope you are all enjoying the summer and the holidays. I am just taking a break for sometime now. Shortly I have to start my summer classes and also it is the pickle season. So will be busy again.

Today I am sharing with you a simple Thank you card.

I usually prefer white or light coloured card stock. But when we buy the stock in assorted colours, we end up with some dark coloured ones. We have to use them up sometime.

For this card I picked up a purple coloured card stock. Purple and orange combination was what I had in mind. But ultimately I chose, purple, white and a bit of orange colour for the card.


I have used a purple coloured card stock A4 size folded into half. Then glued on a white card stock layer. On this I glues the star printed paper tape. Beneath this, I glued the printed Origami paper. It is kind of glossy and not too thick. But I loved the print on it which matched my base of the card.

The labels were cut using the Spellbinders dies. This is one of my favorites. 

This is the inside of the card. I have used white coloured paper A4 size trimmed to fit the card. I have punched the floral design using the border punch on the long ends of the paper, dabbed it with grape coloured ink and glued on.

The envelope for this card is simple white one.


Materials Used:
  • Purple card stock A4 size and scraps
  • White card stock and scraps
  • Printed Origami paper 
  • White paper for insert
  • Spellbinders Nestabilities dies-Scalloped Labels One
  • Small border punch
  • Sentiment Stamp
  • Orange and Grape colour Inks
  • Printed PaperTape
  • Glue

Hope you like this one. Please leave your comments/suggestions. i would love to read them.

Pin It

Blue and White card


Here is another simple card.

I wanted to make some cards smaller in size than the one I usually make using an A4 size.  I have lots of scraps of all sizes, weights and colours spilling out of my over stuffed storage. So I decided to use some.

I always love the blue and white combination.

Here it is:


I folded a scrap of white card stock for the base of the card.

Then cut out the blue layer using the Deckled rectangles Die and glued on to the base.

I first stamped the flower pot and butterfly on a white card stock scrap, coloured it using colour pencils and then trimmed it to fit my card and glued it on the top of the blue layer.

Stamped out the sentiment on to a white card stock scrap using black ink. I scored the border using score board. I don't know whether the scored lines are visible in the picture or not. 

Using dimensional dots glued it onto the card so that the sentiment can stand out. 


I used a blue colour paper as insert inside the card. I punched out the design using small border punch.


Finally I made the envelope using the 123 Punch Board. This was one of my first attempts on the board to make envelops. I punched the design on the flap using the medium sized border punch. 

Hope you like this card. Watch out for more on my blog...


Materials Used:
  • White and Blue Card Stocks
  • Spellbinders Nestabilities-Deckled Rectangles- Small dies
  • Flower Pot, Butterfly and Sentiment stamps
  • Black Ink
  • Colour Pencils
  • Blue colored paper for insert and envelope
  • Small border punch
  • Medium border punch
  • Score Board
  • 123 Punch Board from We R Memory Keepers
  • Glue
  • Dimensional dots


Saturday, April 20, 2019

Gate Fold Card


Hi Friends!

It rained heavily here. Along with the rain there were some strong winds. I am thankful for the rain, as my plants have some respite from the heat. Nothing can substitute rain water for plants. 

Well here is a gate fold card I am sharing with you today. A simple one. It was confusing at first as to how to score for the folds. I started with an A4 size card stock. So I had to trim the length to get proper measurements for the folds. Else I was finding it difficult with the fractions and decimals. :)

Anyway now I got the hang of this particular fold. What I figured out was it was better to have the length in whole numbers instead of fractions. Better to trim off that little extra instead of trying to figure out the measurements.


This is a simple gate fold card. This one is my first card of this fold. I have used A4 size card after trimming the fractional part in the length. The card stock I have used as base is hand made with pink and silver marble design. 

I have used printed craft paper of A4 size cut to fit the folds on either side.

I have used die cuts for the sentiment.

This was an easy card to make, once I figured out the measurements for the folds.


This is the inside of the card. I have glued a thin white card stock on the center panel for writing the message.

Materials Used:
  • Pink and silver marble designed handmade card stock A4 size
  • Scraps of white card stock and pink hand made paper stock
  • A4 size printed craft paper
  • Sizzix Framelits-Circle Scallops
  • Sentiment and flower stamps
  • Black and red inks for stamping
  • Glue


Hope you like this card. Watch out for more on my blog...

Wednesday, April 17, 2019

Green Thank You Card

Hello Friends!

The other night I was watching the Notre Dame Cathedral fire. It was really sad to see such heritage monument damaged. I hope they restore it soon.

Today I am posting one more Thank You card. I have used green colours basically in this card. I rarely use this colour as base except for mats or layers.

I also wanted to make a tall card or long one instead of the usual cards I make using entire A4 size card stock.

OK so here it is:


I have used an A4 size green card stock as base. But the final size was top fold 4 1/4 X 8 1/2 inches and bottom one 4 1/2 X 8 1/2 inches. The top fold is 1/4th inch smaller in width than the bottom one.

I have cut leafy vine from light green card stock using dies from Sizzix. The yellow flowers were cut using punch. The center piece was cut out of white card stock using Spellbinders dies and the edges were coloured using green pigment ink.


Inside the card, I have attached a green printed tape as border on the bottom fold. I have used light green paper as insert for the message.


Above you can see the envelope I made using the 123 punch board from We R Memory Keepers. I have used an A4 size light green paper (matching the insert) for the envelope. I decorated the envelope with the same green printed tape on the front side and more on the back side.

Materials Used:
  • Green colour A4 size card stock
  • White and light green card stock scraps
  • Yellow colour paper for flowers
  • Green Chevron printed self adhesive tape
  • Light green coloured A4 size papers for insert and envelope
  • Sizzix Hello Set Sizzlits Dies
  • Spellbinders Shapeabilities  Pendants Lattice Dies
  • We R Memory Keepers -123  Punch Board.
  • Flower Punch
  • Glue

Hope you like this card. Watch out for more...


Pin It

Tuesday, April 16, 2019

Summer Time

Summer season is here.

Holidays for children.

Time to relax, enjoy with family friends and relatives and also travel. It is also time for marriages in South India. Time to enjoy ice creams, cool drinks, sherbets and seasonal fruits like melons and mangoes.


The temperatures are already soaring and becoming unbearable. Please put out bowls of water for birds and animals daily.


Do take care of yourselves and family. Stay away from direct sunlight in the from 10 to 5 in the day. Take healthy and natural foods and drinks.

Wishing you all a very happy summer time...


A Blue and White Card


Today, I am posting one more thank you card. I wanted a blue and white combination card.

So here it is.


I have used an A4 sized white card stock as base. The top fold (4X8 inches) is smaller in width than the bottom one(5X8 inches). 

I don't know what this type of fold is known as. If you have any idea please let me know.

I took a piece of blue card stock and punched out the borders using those big border punches. Then I glued a floral printed fabric tape on it, which matched it beautifully. 

Then, I cut out a label out of white card stock scrap using Spellbinders Nestabilities-Labels 20 dies.

I stamped the sentiment using blue pigment ink, outlined it using white gel pen and glued it using dimensional dots.

The insert inside of the card is simple white paper. The envelope for this card is simple white one.

Materials Used:

  • A4 size white card stock and a piece of scrap 
  • Blue card stock
  • Printed fabric tape
  • Spellbinders Nestabilities Label Twenty dies
  • Border punch big
  • Sentiment Stamp
  • Blue pigment Ink
  • White gel pen
  • Glue and dimensional dots
  • White paper for insert

Hope you like this card. Keep an eye on my blog for more...


Pin It

Monday, April 15, 2019

Thank You Card

Hello there!

Hope you are all doing well and busy enjoying summer holidays.

The day temperatures for the past two days have been on the rise and unbearable. This is only April yet. I don't know how the coming days will be.

Here is one more thank you Card. Actually I am making a lot of thank you cards. So you will see more of them.


This is also a very simple and easy to make card. 

I have folded  an A4 size white card stock in half, then glued a green card stock layer on it and finally a layer of the printed paper over them. I love the rangoli like design on the printed paper. 

Then I cut the label shapes using the Tattered Lace Essential Dies-Decorative Rectangles(one of my favorites) from green and white card stocks and also embossed them with a smaller sized dies. 

I stamped the sentiment on the white die cut label and used dimensional dots to adhere both green and white labels to give it a little dimensional effect.


This is the inside of the card. I have used a light green(we call it pista colour) paper, cut all the four corners with border punch and glued over dark green colour paper before using it as an insert in the card.

The envelope is plain white colour. I could not make a matching envelope as it needs paper bigger than A4 size which I don't have. 

Materials Used
  • A4 size white card stock
  • Green colour card stock
  • Tattered Lace Essentials-Decorative Rectangles
  • A5 size green printed paper
  • Sentiment Stamp
  • Green pigment Ink
  • Dark and light green colour papers for the insert
  • Border punch medium size
  • Glue and dimensional dots

Hope you like this one. Watch out for more...


Pin It

Friday, April 12, 2019

Thank You Card


Hi friends!

Hope you are all doing well. 

I am busy with the Navaratri till 14th.

Finally final exams of all my students for the last academic year are over. I am relaxing a bit before I begin my summer classes and prepare for next academic year and new students.

Day temperatures are high here. All my family members were down with seasonal fever and recovering. Because of the temperatures, I have to take extra care of my little garden. 

The temperatures drain away your energy. I am only active during early morning and the daily chores through out the day especially cooking is becoming more and more difficult to deal with.

Any ways, I was able to steal a little time for myself and my crafts during all this exam season and festival time.

So I will be sharing them with you. My only problem is taking photographs and preparing the list of materials I have used for creating them.

Here is a simple card half made some time back, when I did not have much die cutting resources.  With some finishing touches I finally finished it.


This is a very simple card. 

I have folded an A4 size white card stock into half and used as base. Added a strip of printed paper and then the dies cuts-scalloped circle and circle with the sentiment.

I could not resist adding the little vine pattern. I had to draw a bit with green gel pen on the pattern as it did not stamp out clearly. 


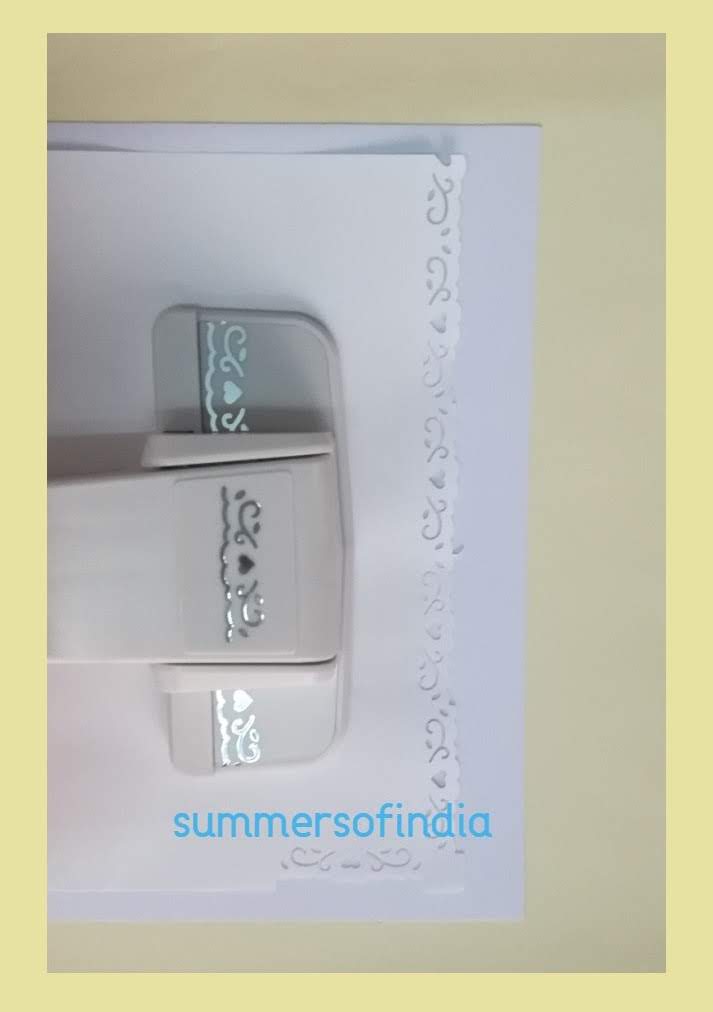
This is the inside of the card. I have used an off-white tick paper. The border has been punched, only in the corner, using small border punch and to highlight the punched design, I have stuck a glitter tape under the punched out border. 

That's all. The envelope for this card is plain white one.

Hope you like this one.

Materials used:

  • A4 size white card stock
  • Printed Paper A4 size-Stripes
  • White and brown card stock scraps
  • Sizzix Framelits-Circle scallop 
  • Essentials by Tattered Lace-Circles
  • Small Border Punch
  • Sentiment and vine Stamps
  • Brown (brownish Orange?) and Green Inks
  • Copper coloured Glitter Tape
  • White A4 size thick paper for insert
  • Glue


Watch out for more. There is lot to share with you...


Pin It