Friday, July 15, 2016

Friday Free Patterns

Here is today's pattern


It is Sunflower embroidered on a pure cotton handkerchief. 

The base is pure cotton fabric. I have used Pearl cotton threads- single strand through out. 

I first embroidered the edge of the circle using dark brown thread and outline/stem stitch. Then I filled up the inside with Chinese knots using the same thread. 

Then, I used yellow thread to stitch the petals, using lazy daisy stitches, starting from one end and stitching around the circle and ending near the place I started. Note that the stitch anchoring the chain is a bit longer and I left a little space between the stitches.

Then using a shade lighter thread, circled each of the chain stitch, passing through the anchoring stitch of the chain. 

I stitched the stems using stem stitch and the leaves using satin stitch.

Stitches used: Stem, Lazy Daisy, Satin, Chinese Knots.

This pattern can be used on hand kerchiefs, blouses, children's frocks, kurtis or tunics, saris, hand and bath towels, table linen, kitchen linen and bed linen.

This is the pattern. You have to size it according to your requirement while printing this.


Hope you like this pattern. 

Please Note:

  • These designs are my own creations.
  • All images and text in this post are copyrighted and all rights are reserved.
  • You can use them for your personal use only.
  • If you use them, please send me the pictures of your work using these patterns, which I will post on my blog
  • OR if you post your work using these patterns on your blog or site please link to the original pattern here on my blog and let me know about it. I would appreciate that very much.
  • If you want to share them please attribute the work to me, with link back to this blog.
  • Please do not re-publish or Post the patterns or my work on your site or blog or any where or distribute my photos or text.
I hope you will respect my request.


Pin It

Wednesday, July 13, 2016

Sunflower Birthday Card

Here is one more birthday card. The theme is sunflower, for sending some sunshine during this monsoon.


I have chosen, cream coloured shimmery card stock as base. I attached the self adhesive black and silver tape. Then I attached the sunflower dimensional sticker.

I added a few butterflies to make it more colourful. 

Then I stamped out the sentiment on a punched out circle from yellow hand made paper. I coloured the edge with yellow and orange pencils to match the sunflower and attached it with double sided foam tape to give it dimension.

This is very easy and simple to make.

Materials Used:

Cream coloured shimmery handmade paper
Black and Silver self adhesive tape
3D Sunflower Dimensional sticker
Butterfly Stickers
Yellow coloured hand made paper
Circle Punch
Sentiment Stamp
Black Ink
Yellow and Orange colour Pencils

Hope You like It

Pin It

Monday, July 11, 2016

Fairy Birthday Card


Hi there. Its been raining here for the past few days. Just showers on and off through out the day as well as night. It is all wet and muddy outside. I am not venturing out to markets unless it is absolutely necessary. 

So I am doing some cleaning and weeding out trash and also reorganising my huge stash of hobby materials, daily for some time. Then, I am spending time on my crafts and also trying out new recipes. 

Here is one more birthday card:

This card has been designed for a little girl.


I started with a soft pink textured card. First attached the blue printed tape. 

Do you believe in Fairies? I certainly do. I feel children should believe in Fairies and miracles. That is why I chose the Fairy theme and attached a fairy with the magic wand. 

What do little ones want on their birthday? Gifts, isn't it? So I attached a gift near the wand - as if the gift materialized by her magic. 

Then, I came across the wonderful dimensional sticker sentiment. This suited the theme of the fairy I chose. 

Next I stamped out the Birthday sentiment, on a circle punched it out of light blue hand made paper.

I always like CAS cards; easy to make and specially for children, I prefer not much clutter on the card.

I am making more cards but they are in various stages.

I don't much like the stamping part. It is all messy and I need to have all my supplies around me. One has to be very careful, in cleaning the stamps and our hands every time we stamp as there is always the danger of using an uncleaned stamp on an ink pad or smudging the greeting cards. 

So I am keeping the stamping part for the last. One day I will stamp out the various sentiments required for my finished cards.

Then there are also the envelopes. I am trying to make matching ones. Here the problem is getting the matching colour or design paper and in right thickness. Here we don't have the availability of materials is very limited and mostly what we want may not be available. So one has to make something out of the available ones.

If I have to post, it then, I have to keep in my mind the weight of the card along with the envelope.  Postage is costly. 

Hope you like my card.


Materials Used:

Light pink textured card stock
Printed self adhesive tape
Some 3D stickers
Light Blue hand made paper
Circle  Punch
Sentiment stamp and black ink

Watch out for more.....

Pin It

Friday, July 8, 2016

Friday Free Patterns

Oh my gosh! It is Friday again. I feel as if days are flying by. 

Well we had some showers, just enough to wet the surface soil. But still facing water crisis as there are no rains in the catchment areas to fill up our lakes or water channels from where we get our supply. We are all praying for rains. The present reserves of water may suffice for another few weeks. 

I am slowly working on my garden. Not much for now, as heavy rains will damage small plants. We need to go slowly, step by step.

Well here is this weeks pattern.


I have embroidered this motif on a handkerchief. The fabric is pure white cotton. I have used 6 strands cotton floss for embroidery- all the 6 strands through out. 

Stitches Used : Lazy Daisy for petals of the flower and the leaves, Outline or stem stitch for the circle in the center, filled up by Chinese Knots. You can stitch more leaves if you want. 

When stitching, first stitch the petals, starting at any point on the inner (green) circle out to the outer circle and filling up in a circular motion.Try to place the stitches, side by side without crowding or leaving space in between. Then stitch the green circle in the center and  fill it up with knots.

This pattern can be used on hand kerchiefs, blouses, children's frocks, kurtis or tunics, saris, hand and bath towels, table linen, kitchen linen and bed linen.

Hope you like it.


For the first time, I have created this design on a computer, as it would be easy for you to use. I could not print it to test it. I hope the size is OK for you to use. I will  try it out my self and see. But do let me know if there is any problem so that I can correct it and update if need be. 

Please Note:

  • These designs are my own creations.
  • All images and text in this post are copyrighted and all rights are reserved.
  • You can use them for your personal use only.
  • If you use them, please send me the pictures of your work using these patterns, which I will post on my blog
  • OR if you post your work using these patterns on your blog or site please link to the original pattern here on my blog and let me know about it. I would appreciate that very much.
  • If you want to share them please attribute the work to me, with link back to this blog.
  • Please do not re-publish or Post the patterns or my work on your site or blog or any where or distribute my photos or text.
I hope you will respect my request.


Pin It

Thursday, July 7, 2016

Bindi- The Forehead Art- Part- 9

Sticker Bindis

Bindis or Sindhur or Kumkum is a must for us Indian Women. It adds beauty and completes our make up. In earlier days, powder or liquid was used. Now sticker bindis which are ready made are used. Now a days very few use the powder or liquid. 

Sticker Bindis have become very popular because
  • easy to wear
  • just stick on the forehead and they stay there
  • no fear of getting wiped off just with an accidental swipe of hand or from water or sweat
  • easily available
  • available in many colours, shapes and sizes
  • costs less
  • easy to carry
  • can be reused many times
  • available in simple designs for daily use
  • fancy and designer-wear available  at reasonable cost which look grand with pearl or stones 
So these days most of us wear sticker Bindis. I love collecting a variety of Bindis, though I may not wear some of them.  

Here are some from my collection of designer Bindis:


The center design is worn on the forehead between the eyebrows and the curved ones above the eye brows. Usually worn by the bride or by traditional dancers.

One can wear it on special occasions or parties. Some are simple some are heavy.


Designer Bindis make a great gift for young girls and ladies during our religious occasions like Dusehra, or Sravana Puja. 

Hope you like them. Watch out for more.......

Pin It

Monday, July 4, 2016

Card Making Kits-2

Remember in one of my posts I told you about Card Making Kits? The fist card was here:


Well here is the second card. 


I took only the pink card stock and the white envelope from the kit. The rest all I added on my from my stash. 

I wanted this card to be very simple. So I started by attaching some matching plaid tape and then the flower shaped buttons. 


Then I felt this was too simple and ended up adding some wooden butterfly buttons. Actually I have a variety of buttons, sequins, beads and such things in various materials as I also indulge in hand embroidery. 

Further I added some pieces of the same plaid tape onto the envelope.


I have not added any sentiment. I will when I have to give it away. I think this will be fine for a Birthday, Thank You, Miss You or Sorry Card. 

What do you think?. 

I have many cards in various stages of progress. I am working on them. Stating from this month, I have Birthdays and many other occasions lined up. So I am preparing them in advance. I can only post, after I give away the cards or else there will be no surprise.

But watch out for more cards.....

Pin It

Friday, July 1, 2016

Friday Free Patterns

Friends I am reviving this post. I have lots of patterns to share with you. The only problem is I have pencil sketches, which need to be inked with black ink, so that you may get a crisp picture when you take a print out. 

I have been promising since long to post these. But I wanted to try them out and give you my version of stitched design too. Any ways from this week I will again post patterns every week. 

This weeks pattern is here:

This is a small design embroidered on a hanky. The base fabric is white coloured pure cotton fabric.


I marked the design with a pencil directly on to the cloth. 
 After finishing my embroidery, I drew the pattern on paper for you.


Stitches used were: Bullion, Stem, Lazy Daisy (Single Chain Stitch), Chinese Knot.

I have used mostly 2 or 3 strands of 6 stranded cotton floss. For the flower in the center done with Chinese knots, I have used all six strands.

This pattern can be used on Hand kerchiefs, blouses, children's frocks, kurtis, saris, hand and bath towels, table linen, kitchen linen and bed linen. 

Hope you like it.


Please Note:
  • These designs  are my own creations.
  • All images and text in this post are copyrighted and all rights are reserved. 
  • You can use them for your personal use only. 
  • If you use them, please send me the pictures of your work using these patterns, which I will post on my blog 
  • OR  if you post your work using these patterns on your blog or site please link to the original pattern here on my blog and let me know about it. I would appreciate that very much. 
  • If you want to share them please attribute the work to me, with link back to this blog. 
  •  Please do not re-publish or Post the patterns or my work on your site or blog or any where or distribute my photos or text.
I hope you will respect my request.


Pin It

Thursday, June 30, 2016

Golden Opportunity


Do you like reading Romance? I just love reading Romances. If you get a romance with intrigue also then? I would definitely love it.

Friends, this is really a golden opportunity for you. Today I am sharing the link to Freebie being given away by Goldenhaze

Goldenhaze is the pen name of the author and my sister Anu Ram who is a doctorate in Business Management and writes fiction for hobby. Her first novel The Mirage, was set in the back drop of Rajasthan and highlighted the theme of women empowerment, woven into romance and intrigue. 

The sequel of the Miirage, The Pursuit was again a romantic thriller which was much appreciated. Goldenhaze has also written several novels including The Masquerade, An Evening with U, The WhisperValley and Vaishali.


Known for the variety in her story settings, and the usage of local flavors and languages, with many ongoing works of her on her website, like A Dialogue in the Dark, The Inexplicable Attraction and the Contrivance.

Currently Goldenhaze is working on the launch of a new stream of intense romance, under the Destiny series, with Deepthimaan- a character she created in Mirage as the lead, who also happens to be the pivotal character in her much acclaimed novel Destiny U&ME.

Being her sister, I had the opportunity not only to read her works but also discuss the twists and turns of her plots. I loved all of them. The way she writes is amazing. So here is an opportunity for you to read one of the books for FREE:


Goldenhaze Give Away! 
100 copies of An Evening With U
Click here, and Grab your FREE copy Now! 
*offer on first come first served basis


An Evening With You

Hurry! Grab one and please spread the word ......

Pin It

Friday, June 24, 2016

Teens Trends-1


Hi Friends. Today it is partly cloudy here. No rain yet. 

I  promised to share with you latest trends in teen jewelry. Here it is. Me and my niece went on a shopping spree just before her school reopened. These are the ones which are in vogue with teens this season. With almost end of the summer holidays, the shops were full of mothers, aunts and young girls trying to buy these trinkets. So we had a hectic day shopping for these things.

Please excuse me for the poor quality of the photos. I had to take the photos in a hurry as my niece insisted on taking away her purchases with her.

These are some hair accessories.

 These have floral prints on them

 These have florescent colours.
 I like the above one. It is more colourful.
 This one has some cartoon characters on it.

I bought some extra strips. They would make a great gift for little girls. No need to run for gifts every time. Will save time and money too.

I will be posting more...so watch out....


Pin It

Wednesday, June 22, 2016

Back To School Card

It is cloudy here. Just a little rain. Not even reaching the parched earth. Very humid. Still waiting for proper showers so that I can carry on with my work in the garden.

Here is a card made last week. It is back to school time here.

As usual I was under pressure to make these cards with no time at all. I am posting only one card as I couldn't take photos of other cards.

The base is white card stock. I have attached polka dot printed tapes pink and blue colours. Then the stickers of slate, bag, book and colour pencils. I punched out a circle from pink card stock and stamped  the Good Luck message with black ink. I attached it to the card with double sided foam tape.

I attached the same printed tapes to a white envelope and stamped the  sentiment in pink and blue coloured inks. 
So. Here it is.

As of now, I am making only simple cards. I am busy with cleaning my home and garden for the monsoon, in between attending to my other chores. I think I need more confidence and spare time before I experiment with some of my creative ideas. 

Thank God the pickling season is over for now. It is a lot of work. Need some time to rest.
But I enjoy pursuing my hobbies and creating something new every day. 

Materials used:

White Card Stock-Ivory Sheet
Polka dots printed self adhesive tapes
Stickers
Sentiment
Black, pink and blue coloured inks for stamping

Hope you like it. 

Pin It

Monday, June 20, 2016

Custard Apple in Bloom

Hi there!. Finally monsoons are here. But not in my garden. There were some showers may be in other areas of the city, but my garden is still waiting for the monsoons. Yesterday and today, it was completely cloudy and there were just a few drops of rain. 

I have a Custard apple tree in my garden. It is also known as Sugar Apple. It is a very hardy tree. Requires very little maintenance and grows in any soil. Pests are almost nil. 

It does not grow into a very big tree with huge trunk like mango.

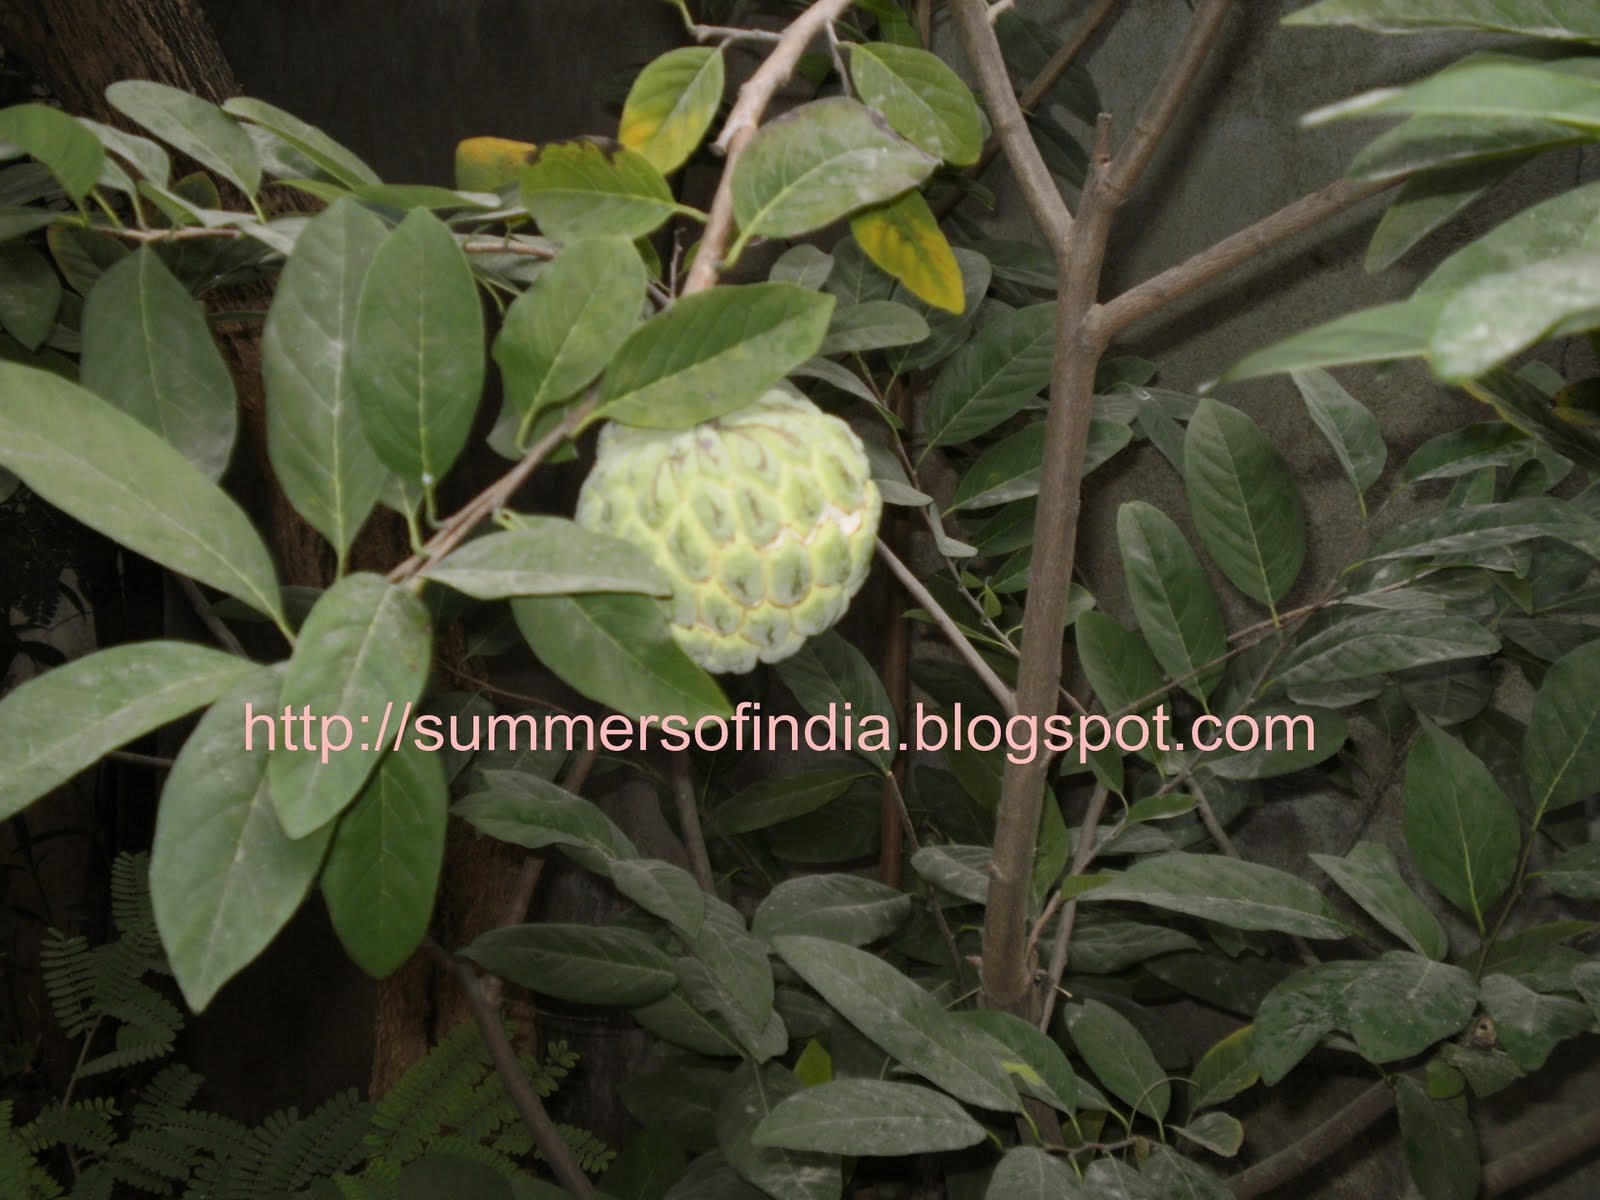
Its fruit are very sweet but with lots of seeds. It is rich in Vitamin C, B and many minerals. It is also known to be rich in calcium. The fruits are available in winter season.

Just have a look at the fruit.


Once the fruit is ripe enough it is very soft to touch. So we can check the fruit and pluck it. It also break opens on ripening.
This is the bud. I never noticed it before, even though I have this tree in my garden for some years now.
Here is the flower. I could not take a proper photograph of it as it hangs down and it was very difficult for me to photograph it. 

This is specially grown in hilly areas by the tribals. Rather they collect fruits from the jungles where these trees grow in forests of certain regions. Since they are grown naturally with out any human interference like adding of chemical manures etc, they are organic and good for health.

When we are travelling in certain areas, by road we can see the tribals or villagers on the road side selling these fruit. They collect these fruit (unripened) from the nearby forest and put they in bamboo baskets or straw baskets and cover the fruit its leaves. So they ripen slowly and naturally few at a time.  We can buy them in dozens, or 50-100 fruits by count or basket fulls. They sell it at a very cheaper rate when compared to our local markets.

We always buy them basket fulls. All our family members love it, so we have to have enough for every one. Moreover when we are travelling and in a group, snacking on these fruits on the road side is fun. Only annoying thing is there are lots of seeds and less flesh. So it is hard work if you want to eat it. Its also messy. But then who is complaining as it is so delicious.

I also love to talk to these people. The men and women are simple and especially the women are so beautiful. But mind you some of them may cheat you.Usually a few bigger fruits are placed on the top and underneath it there may be very small fruits or  raw fruits plucked before they have fully developed, which cannot be ripened. So we have to check the fruits in the basket and bargain before buying.

Even when we are travelling by train, we can find these people selling them on train. They board the trains, with baskets loaded with the fruits on their heads from nearby small stations when the train stops for signals or crossings. We have lots of time on train journeys, and generally people like to buy fresh fruit and enjoy them during the journey. I always feel hungry on train journeys and love to snack on these fruits and other healthy snacks sold on the trains or at the stations.  

Ice creams, milk shakes, puddings and desserts are made using the flesh of the ripened fruits. I prefer to eat it straight. 

On one of my tours travelling by road in Telangana,  we stopped at road side on the high way to stretch our feet. I saw a small group of children and women, sitting around piles of twigs and roasting something which smelt so yummy. I was curious and asked one of the children what they where doing? They told me that the make a pit in the ground, put some dry leave and twigs in it, then some raw custard apples plucked from near by forests, cover it with leaves and twigs and light it. The fruit gets cooked in the fire/coal slowly. After it cools down - may be in  2-3 hours time, they recover the fruits peel it and eat it. 

The custard apple tree in my garden is in full bloom. In a few days time, we can see tiny fruits on the branches. By Vinayaka Chaturthi (in the months of Aug-Sept) we have small raw fruit. We offer it first to Lord Vinayaka-the Elephant God. Then by winter we have the fruits, ready to eat. 

Waiting for the fruits.......


Pin It

Friday, June 17, 2016

Updates from My Garden


Half of June month is over. No rains yet. It is once again hot like in summer. We are again facing water problems. 

A few days back we have had some showers. It was a great relief. Here is a small peek into my garden.

Bougainvillea blooms through out the year if proper care is taken. But its blooms are the best in summer. It is a very hardy plant and requires very little care. I have some in pots for Bonsai. A little pruning and some fertiliser is all it requires. It can with stand hot temperatures. But those in pots require proper watering and semi shade during peak hours of the day. 

They look so beautiful when they are in full bloom. They are also known as paper flowers.

This is one variety of hibiscus. The size of flowers is small. But it blooms profusely and almost daily. It is still a small plant in my garden.
Just a few showers can do wonders to the plant life. No amount of water or fertilisers  we add can bring this green colour to the leaves. God's creation is great and has no competition.

Well I am waiting for the monsoon to begin my work in my garden. I have just weeded it out and just keeping it alive somehow. 

Wish rains would be here soon.......

Pin It

Wednesday, June 15, 2016

Birthday Cards for Kids

Hi Friends.

Back after nearly a fortnight. I have been busy with my new batch of students. It will take me till the end of the month to settle everything into a rhythm. After a long period of holidays, children will take time to settle down. I also need to work out a schedule and stick to it.

In between I had to attend to my dad's annual ceremony. A few days before and few days after it we have had a lot to do. It is really back breaking with all the work. But then rituals are strictly to be adhered to. 

Here it is hot once again. No rains. Humidity is really unbearable. So I could not spend much time on my crafts. But one of my friends wanted a birthday card for a little one. I had just 4-5 days and with my dad's ceremony in between it was really difficult to create something which would catch  the eye of the child, its parents and the sender(my friend). 

I did manage somehow to make this card. Then I had to mail it to reach on time.

This was what I came up with. 

I used a textured blue card stock, attached some stickers of animals. 

For the tree, I cut brown coloured thin hand made paper for the trunk and glued it. Then I punched out some oval shaped green textured hand made paper for the foliage. I attached some self adhesive red crystals as fruit on the ovals. 

The first layer I glued it directly on the card. The upper layers, I used foam tape for dimension. 

I punched out some green coloured thin card stock for grass and glued it near the base of the tree. 

The sentiment was stamped on thin yellow card stock. I then shaped the edges with a bracket punch. Then I used a brown coloured sharpie to colour the edges of the sentiment as well as the tab, before attaching it to the card. 

This is the inside of the card. I added the sentiment, message and balloons and the cake. I got it printed on a cream coloured papaer and glued a heart shaped puffy sticker.
This is the envelope. I had to use a ready made white one. 

I had some anxious moments when I was pushing the card inside it. I wanted to make a box type envelope to fit the dimensional stickers and punch art I used without squashing them. I didn't have time at all. Moreover, I am not experienced enough in making such envelopes. I didn't even have proper tools or materials to make one. 

Thank God! The Card fit the envelope :) With not much space around it. I attached mini and mickey stickers on the outside. I wanted to stamp it but no time at all.

I couldn't do much as there was no time to even think or shop for material. I had to do with what I had at hand.

I mailed the card and it reached on time. I got a feed back that they all loved it. So everything ended well. Hope you like it too....

Materials used:

Blue textured card stock
Yellow card stock
Green card stock
Green textured hand made paper
Dark brown hand made paper
Animal and cartoon stickers
Red coloured acrylic self adhesive crystals
Clear stamp for sentiment
Black ink for stamping
Brown coloured sharpie
Glue
Envelope
Cream coloured thick paper for inside the card


Pin It

Sunday, June 5, 2016

Card Making Kits

Hello there. We are having some showers here. Day temperatures are down. But it is still sultry. With frequent thunder storms, power cuts have become regular feature. So I have to do all my work as fast as possible-whether it is my daily chores or any other work related with electricity very quickly. We are always apprehensive as to when there will be a power cut. If we are stuck in the middle of doing something, then we have to wait until we get back electricity. 

One of my friends gifted me some card making kits. It was some time back and I din't even have time to open and inspect it. Recently, I opened it. Look what I found.

Three different colour card stock, folded and ready to use, three envelopes(white), some embellishments and double sided tape cut into neat little squares.

I felt that the size of cards was way too small. Any way while trying to make the cards, I ended up adding my own embellishments, as some of the one provided were too small.

Here is the first card I made.


I added the purple plaid self adhesive tape, some crystals and the butterfly from my own stash. The butterfly seems to be a little big for the size of the card or the embellishments. But that was the smallest I had and in matching colours.


I jazzed up the white envelope by adding the plaid tape to match the card.  I have not added the sentiment. I made it as all occasion card. I will add required sentiment when I have to give it away.

I think for a beginner or a novice, this kit may be of help. They don't have to buy all the required materials from different places, which is not only time consuming but also costly. But for a crafters like me, who has so much of stash lying around, I think, I prefer to do it in my way, choosing what I like and goes well with the theme or the card. 

What do you think about this card? Watch out, I will be posting, other cards I made.


Pin It