Friday, November 18, 2011

Gopuram Stitch Tutorials

Friends, I was going through some of my very old doodling clothes on which I used to practise my embroidery stitches learnt from various sources and came across this stitch.


I have learnt many from my maternal Grandma. In her childhood she studied in a school run by nuns. Such schools were called as Convents by the local people. My Gran was very proud of having studied there. Her English was impeccable. Well she learnt embroidery, crochet, sewing etc in her school. She had a very good knowledge of embroidery stitches not only the Indian ones but also those from across the world.We grand children used to sit with her and talk about her school days. We also used to learn embroidery and crochet from her. She had good memory and even after 70 years or so, she could tell us the name of the stitch both in English and local language. But alas at that time I never bothered to note down those names. 


Here is one of the stitches I learned from her. She named it as Gopuram Stitch. Gopuram means Temple dome. She was not sure from where she learned this nor the name of the stitch. When she taught me I remarked that this stitch reminded me of a temple dome-so we named it as Gopuram stitch. We used to (re)name many stitches to remember them easily--:)...:)...

If any one knows about the origin or name or any other information about this stitch, please let me know. I have not come across any similar stitch so far. Though it looks like an inverted Feather Stitch.

I have tried to put it down properly for you as tutorials:


The stitch belongs to Chain Stitch or Looped Stitches family. It can be stitched on any fabric-that is this is not a counted thread stitch.


STEP-1
Fig-1
This is how the stitch goes. I have marked the points for illustrative purpose. When we actually stitch we need no marking.


STEP-2
Fig-2
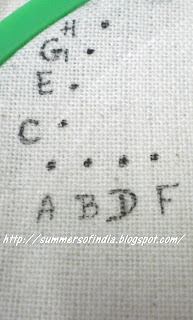
Bring out the needle up through the fabric from underside at point 'A'.

STEP-3 
Fig-3
STEP-4
Fig-4

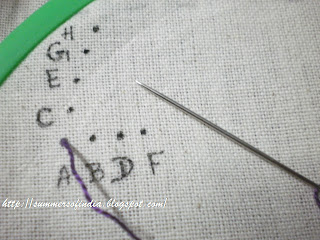
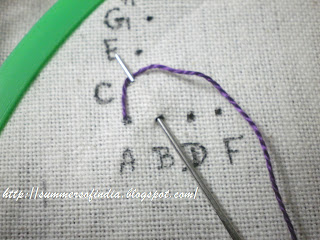
Now insert the needle  at 'B' a little away from 'A',  going under the fabric and come out at 'C'. Loop the thread from left to right from under the needle forming a loop. Now pull the needle to get the first stitch or loop.

This is almost like a chain stitch, except that that in chain stitch we insert needle at A where as here we leave some space in between. 


STEP-5
Fig-5
STEP-6  
Similarly make another loop from 'F' to 'G'. 
Fig-6
Now again make a loop by entering at 'D'  a little away from 'B' and coming out at 'E'.


STEP-Final

Anchor with a little straight stitch at 'H'. We have completed the basic part of the stitch. it should look like this one as shown below.
Fig-7
SOME TIPS:

The points A, B, D and F should be equidistant from each other. I have put more space between points, A,B,D and F (Fig-6)so that the stitch is clear to you. 


Similarly points C, E, G and H should also be equidistant from each other. 


Also notice that point 'C' should be a little to the right of A and so on and not mid point of A and B. That is the original stitch taught to me (a part of it). 


Actually there is more to the stitch I learnt. I will be posting it in my next post.


Here I have tried to vary the stitch for my sampler. 
Fig-8
In the stitch at 4, I have placed points C, E, G and H as mid point of A-B, A-D and so on. In 5, I have placed them to (almost) right side.
Fig-9
I have used beads (2) and cut glass beads (3). In 4 above I have anchored the stitch with a chain stitch.
Fig-10
Here the stitches shown at 1,2 and 3 are not correct. I was just practising on a doodle cloth before I got it correct at 4. See 8 and 9, I was trying to build up a pattern.


BEST SUITED FOR:


As a border around the necks, sleeves and hems of blouses, kurtis or tunics, skirts for decorating CQ blocks and on pillows, cushion covers, saris etc.


I am still practising the stitch and trying to build up a sampler. The best part is yet to come. So watch out for more...


Practise the stitch and please do mail me your innovations with the stitch so that we all can share them...


Friday-Free Patterns

Here is this weeks pattern:


This motif is for gold work or Zardosi work, Antique work, Kundan work or combination of all these and also for Satin stitch, Chain stitch etc.


Thursday, November 17, 2011

Meenakari Ear Rings

Of  late I have been following the latest fads and fashions in jewellery as I am creating some pieces my self. I am really fascinated by the variety our Indian markets offer us. These range from antique designs to the most latest and modern pieces. One of them I love is Meenakari or enamelled jewellery. These are enamel paint on metal surface-not too costly but very beautiful. Here are some I just could not resist picking up:

Look at these above. They have tiny hibiscus flowers on the corners-red and blue with green leaves in the between. You can see the small pearls and the kundan drops dangling below.
 This is how it looks up close.
Here is one in maroon red. 

I just could not resist these beautiful ear rings. But I am yet to get matching necklace to wear with them. This always happens with me as I pick up individual pieces and try to make a set out of them. It takes a long time and patience and also a very good memory to  scour the markets, exhibitions/sales to find the pieces to make an entire set with in the budget. 

Keep watchin....for I have more to share with you...so many lovely pieces...

Tuesday, November 15, 2011

Crystal Ear Rings


Crystals are now in fashion. Whether cut, transparent, opaque-they are available in different colours to match your dresses. The jewellery made of crystals can be very simple and plain to dressy, depending on how we use it. Teemed with proper pendants and ear rings they are a must in a women's jewellery collection.

Here are some ear rings to match your Crystal necklaces:


These are available in different colours and designs. These are quite affordable and can be worn by kids and teens too. Some more next time....Keep watching my blog......


Wednesday, November 9, 2011

Learning Banjara embroidery


Hi guys. I am recovering my strength slowly. So I have started slowly going through my stash of paper cuttings, books, craft supplies and what not. There is a lot to go through, organise, classify and properly store them. You know every time I start doing that, after some time, I pick up some paper cuttings or a book and start leafing though them. I become engrossed in them so much that I forget what I am doing...:). It happens every time no matter how strict I try to be. So I never ever finish sorting them. That is a real problem.

Oh I am learning Banjara(Gypsy) Embroidery. Well I am very excited about it. But need to work a lot on that first

I have to work on my jewellery too as I have lots to do. Some coloured seed beads here:

Such beautiful colours . These beads are available in many colours. The cut ones are costly but look very beautiful as they reflect light and hence shine. But stringing them is quite  different matter. I have many projects were I have readied my design and bought every thing required, but need to work on them. Let us see....

I have bought some very beautiful pendants along with Meenakari and some ceramic beads.   ...So watch out for more on these things and may more.....


Monday, November 7, 2011

Rangoli-139

Dwadasi Special

Today is Dwadasi-means 12th day of the month. As per our Hindu Calender, the 12th day of month of Kaartika is celebrated as Chiluku Dwadasi or Ksheerabdi Dwadasi. Ksheera means milk and it is used in the ceremony observed today.


Today we worship Tulasi plant or Indian Basil along with the plant of Gooseberry, Lord Vishnu and Goddess Lakshmi. It is a  ceremony which women perform for health prosperity and happiness of the family-starting with . We offer prayers in the morning and again in the evening. Earthenware lamps using ghee (clarified butter) of Cow. Lamps are also lit on Gooseberries. Like  on Diwali day, we light as many lamps as possible and decorate our house and yards.

It is said that on this day Radha Rani observed this ceremony in Brindavan(or Vrindavan or Vraj a place where Lord Krishna spent his child hood) for Lord Krishna
In our homes we must have a Basil Plant in the back yard and every day women of the house offer prayers both morning and evening. It is kept in a specially constructed pot known as Brindavanam or Tulasikota. 
This is the Basil Plant
This how its pot looks. One can draw this free hand design too. Actually 5 Rangolis of lotuses(shown below) has to be drawn in front of this pot. 
My maternal Granny used to celebrate this ceremony with much fervour. There are many traditional Rangolis of Tulasi Kota or Brindavanam-the pot where Tulasi is planted and worshipped.

Here is a simple one:
I have many other complicated Rangolis of the same. But I need to search them.


Sunday, November 6, 2011

Friday Free patterns

Hi Friends. I was away and came back yesterday late into the  night. it was a very tiring but very nice trip. I am so tired after the trip.

I could not post any free pattern. But here is one site where you will get two beautiful vintage patterns of flowers and peacock:

Maureen has also given some motifs here:

She has also given some very beautiful projects along with tutorials and the patterns to down load.: 

I loved the Ribbon Doll very much. I will try it out one day for my niece.

Please take time to visit her blog here:

It is beautiful and there is lot to learn, see and enjoy. 

Friday, October 28, 2011

Friday-Free Patterns


This is again a peacock from Kalamkari Motifs. This can be used for embroidery and painting. 


Thursday, October 27, 2011

Designer Blouses

These days, it is the blouse that is the high light of what a women wears. Women are so crazy about, unique and fashionable designer wear blouses that sometimes, the cost of the blouse may be more than that of the sari. Many women just don't mind spending on some great blouses more than what they would have spent on saris, some five years ago. It is the blouse that a woman wears with sari which makes a fashion statement these days.

So here are some more Blouse designs.


Just go through them. They are best and unique....


Blouses in Fashion

Designer Blouses:

These days we have so many designer blouses, available in the market. They are available in small medium and large sizes. The sides are left un-stitched  so that, we can stitch according to our requirement. 

They are mostly available in Benarsi materials or brocades with embroidery or sequin work etc. Here is one that I have bought recently:
This is the back side. You can see that it is made of striped patches. See the sides have to be stitched.
This is the work it has.
Just a little work on the sleeves.
A close up of the motif worked in sequin and cut dana.

I chose the most simplest one. I don't like heavy work on my clothes, though I admire it a lot.  This can be worn with many saris of different colours-either matching or contrast.

I found it a bit loud and all glittery. But that was matching one of my saris. So I just gave in and bought it.

There are blouses with much heavy work including stones, sequins etc.

Keep a watch on my blog for more to come.....

Threshold Art-1

Threshold means an entrance or door way. Threshold (door frame) for us Indians has lot of significance. Especially the threshold of main door. In olden days, houses of rich and royalty or those houses which were very big, temples and forts had huge doors and huge thresholds ie., the main doors leading into the house. I remember in my child hood, all the houses had thresholds (the main one) that were one foot wide and one foot high at the bottom. Even the rooms inside the house had thresholds but were in smaller size.The doors and thresholds were generally made of fine quality teak wood. 

Decorating the upper portion of the doorways with torans, I am already covering that  under the head "Torans". Here I am talking about the bottom portion of the door ways. Here after when I mention threshold, it refers to the bottom portion of the door frame. This is known as Chaukhat in Hindi and Gadapa in Telugu.

The threshold (bottom portion) is considered as a place where Goddess Lakshmi (Goddess of Wealth and Prosperity) resides. 

Threshold art is the art of decorating the threshold with turmeric and vermilion. Since my child hood I have been fascinated by this art. Each household or rather lady of the household has its/her own way of decorating the threshold which has been handed down over generations.

How to apply turmeric and vermilion:

First of all the bottom portion and the sides of the frame (upto 1-2 feet) are washed with water to clean dirt and also to wet the wood. Turmeric is mixed with water or with sour curds (this gives a beautiful colour) into a paste and applied. Then it is decorated using red coloured vermilion and rice flour.

Here is one of the ways:
Side bottom of threshhold
Bottom of the threshold.


Watch out for more...in my next post....

Tuesday, October 25, 2011

Designer Diyas


Diwali the festival of lights brings happiness across the country irrespective of regions, languages, states. It is celebrated by all. It is the time for bonding, enjoying, remembering departed souls and lots more. 

This is the time to give gifts to near and dear ones, friends relatives, employees - in short to one and all we want to say thank you. There are so many gifts to choose from. Candles and lamps are one of the most chosen gifts and also most appropriate for the occasion. How about some designer Diyas that to lovingly made by us? Our love and affection for the persons whom we gift these shines through our efforts of creation.

Oh by the way down South we light lamps every day in the month of Kartik. We celebrate the Purnima (Full Moon) of Kartika as an auspicious occasion, fasting, decorating our homes with earthen ware lamps like we do on Diwali. Finally on the new moon day we float the lighted lamps in rivers, lakes or such water bodies as culmination of our month long prayers. It is considered as very pious to give a lighted lamp (silver, gold or clay) to a Brahmin any time during this month. 

So learn with me in creating some simple designer diyas.

Require:

Terracotta or earthen ware lamps
Paints and brushes
Water
An old news paper

First of all buy some terracotta or earthen ware lamps (Diyas) available in different sizes and shapes. These days you get so much variety. 

You can use enamel paints. But the variety in acrylic or fabric paint colours is very wide. You can choose from ordinary, pearl, metallic, glitters etc. You can also use glitter powders, 3D tubes or cones for decoration. These colours are also easy to handle. You can just add a few drops of water (or medium). 

Put all the lamps in a tub and pour water enough to cover them by good few inches. It is better to soak them over night. This soaking has to be done whether these lamps or painted or not. If not they soak away all the oil poured into them. Similarly if soaked we can paint them nicely and evenly.

If not 5-6 hours. Then remove them and put them face down for an hour or so and then stand them right for an hour. Now they are ready to paint. Paint them in colours of your choice  Add dots, stripes after the paint dries off or dust them with glitter powders (when the paint is still damp). For decorations of 3D effect, use 3D paints which are available tubes of plain, metallic and glitters.

Red Yellow and Green are considered as auspicious colours. You can use other colours too except black. Don't use Black. Gold Silver, Bronze and other metallic colours give a nice affect. 

Let them dry out completely. Wrap them in colourful gift wrappers.

Here are some I am working on.


These need a few more touches. I have to paint the outer sides (or under sides). I don't paint the bottom as it cannot be seen. I have used pearl and metallic shades.   Actually I had made so many, which were packed and gifted. I could not photograph them.

Will post more in my next post...so keep watching....